
Photoshop Tutorial
Photoshop is the leading digital image editing application for the Internet, print, and other new media disciplines. It is embraced by millions of graphic artists, print designers, visual communicators, and regular people like you. It's likely that nearly every picture you've seen (such as posters, book covers, magazine pictures, and brochures) has either been created or edited by Photoshop. The powerful tools used to enhance and edit these pictures are also capable for use in the digital world including the infinite possibilities of the Internet.
In the past few versions (CS3 & CS4), Photoshop has been enhanced to allow for ? (list enhancements here).
It is almost impossible to use or even learn all of Photoshop's tools to their maximum benefit. Photoshop has been around since 1982! That's around 25 years of troubleshooting and advancing software. This workshop will go over the main features of the program so that you will feel confident to explore the remaining features on your own.
History Of Photoshop
Photoshop was originally created by two brothers, Thomas Knoll and John Knoll. The two brothers shared interests both in photography and computing, and had the use of their father's darkroom while growing up.

In 1987, Thomas Knoll, a PhD student at the University of Michigan, began writing a program on his Macintosh Plus to display grayscale images on monochrome display. This program , called Display , caught the attention of his brother John Knoll , and Industrial Light and Magic employee , Who recommended Thomas turn it into a fully – fledged image editing program . Thomas took a six month break from his studies in 1988 to collaborate with his brother on the program, which had been renamed Image Pro
Later that year Thomas renamed his program Photoshop and worked out a short –term deal with scanner manufacturer Barneyscan to distribute copies of the program with a slide scanner a “ total of about 200 copies of Photoshop were shipped that way
During this time, John traveled to Silicon Valley and gave a demonstration of the program to engineers at Apple and Russell Brown, art director at Adobe. Both showings were successful, and Adobe decided to purchase the license to distribute in September 1988. While John worked on plug-ins in California.
The Workspace
The Photshop workspace consists of five main components: the Application Bar, the Tools Panel, the Options Bar, the Document Window, and the Panel Dock. One of the nice things about using Photoshop is that its workspace interface is very similar to that of other products in the Adobe Creative Suite, for example Indesign and Illustrator.

The Application Bar
The Application Bar, new to Photoshop CS4, is located across the top of the screen. It contains the old menu bar, along with a number of other controls, for example a dropdown zoom menu, a button for launching Adobe Bridge, and a button for viewing extras. The menu bar contains controls for managing and editing files, manipulating images, managing layers, and more.
Tools Panel
The familiar Tools Panel contains a collection of tools for creating, selecting, and manipulating images. Tools that have a similar function are grouped together.

Options Bar
The Options Bar is located below the Application Bar. The options change depending on the tool you have selected. For example, when you select the Type tool, options pertaining to text editing will appear across the bar.
Panel Dock
A vertical dock of panels is located on the right of the workspace. Panels help you manage and edit your images, allowing for quick and easy access to the most common controls for a particular task. By default, three panels will appear when you open Photoshop: the layers, adjustments and styles panels.
To access more panels, click Windows from the Application Bar, and click the panel you want to open. To hide a panel, click Windows from the Application Bar, and click the panel you want to hide.


Move tool:
Only one tool allows you to move items in the document window, and this is
it. It allows you to move several items, including guides, objects and shapes in shape layers, and text objects
Shape Selection tools:
Shape Selction tools allow you to quickly select areas of the document. Using rectangle, ellipse, row, and column shapes.
Lasso Selection tools:
Lasso Selection tools allow you to quickly select areas of the document by using the mouse to draw a lasso around them.
Quick Selection tools:
Quick Selection tools can intelligently select areas of the document by detecting areas that are similar to those selected by the mouse.
Crop and Slice tools:
The Crop tool lets you select an area of the document to keep and remove the area around it. The Slice tools are used for creating clickable hot areas for Web images.
Eye Dropper/Ruler/Note/Count tools:
This tool set is a catchall. The Eyedropper tool is used to select foreground colors directly from pixels in the image.. The Ruler tool is used to measure areas in an image. The Note tool allows you to add notes to an image that help you retain things such as to-do editing lists with the image. The Count tool allows you to count and log items in the image, which can be useful if you are working with medical images.
Working with Images
Creating a New Image
To create a new image, follow these steps:
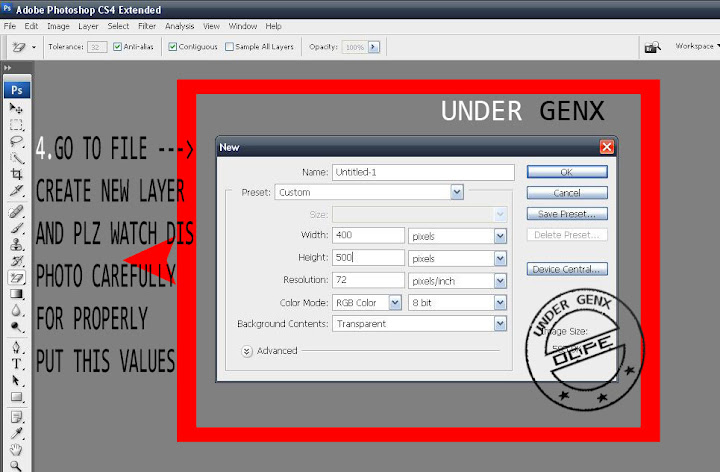
1. Click File from the Application Bar.
2. Click New. A dialog box will open, allowing you to define the following elements of your image:
* Name - allows you to name your image.
* Size - allows you to predetermine the width and height of your image. Photoshop offers preset dimensions for sizing your image, or you can customize your own size using many types of measurements including pixels, centimeters, inches, and millimeters.
* Resolution - allows you to set the image resolution. A resolution of 72 ppi (pixels per inch) is generally used for Internet images. If you wish to use your images for print or video, they will need to be a higher resolution.
* Color - allows you to control the color mode of your image. The standard color mode is RGB (Red Green Blue). You can also choose to create your image in grayscale, bitmap, and more. Some modes will limit your color range.
* Background Content - allows you to choose the initial background color of your image.
3. When you are happy with your selections, click OK.

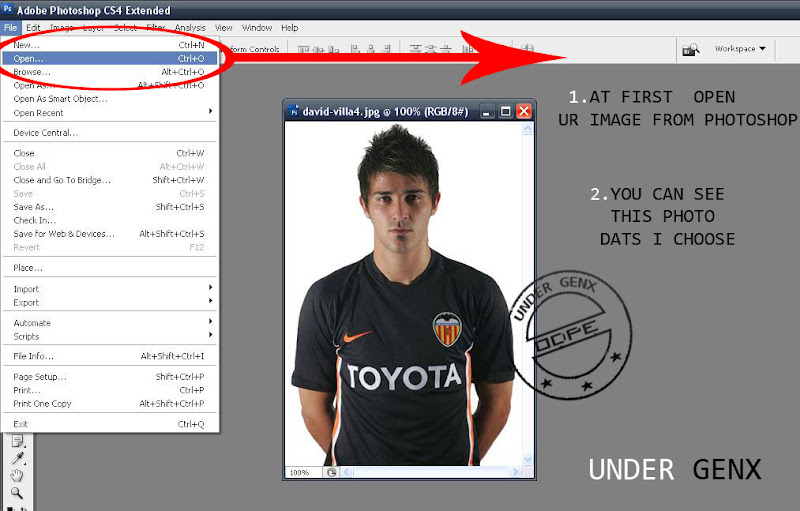
Opening an Existing Image
To open an existing image, follow these steps:
1. Click File from the Application Bar.
2. Click Open.
3. Navigate to your saved file.
4. Click Open.
Saving an Image
To save an image, click File and then click Save.
Text transition animation
You should check the Speaker Animation tutorial before trying this one.
Here's another Photoshop Animation tutorial. This time you'll learn to create this text effect:

1. Open a new Photoshop document. Create a background layer, I've drew mine using the brush tool.

2. Using the Text Tool(T) draw your text. The text that you'll want to be displayed in different frames must be created in a new layer.


3. Group your text layers (select the layers and press CTRL+G). Duplicate the group by right clicking next to the group name, then clicking Duplicate Group. Name this new group "blur". Select all the layers inside the "blur" group and right click next to one's name and Rasterize Type.

4. Select the first layer in the "blur" group and apply Filter->Blur->Motion Blur.

Click the second layer and press CTRL+F to apply this filter again. Do the same for all the layers inside the blur group.
5. Open Window->Animation. This will be a bit harder then the Speaker Animation . Hide all the layer inside the groups. In the first frame should be visible only the first text-layer from the text group. In the second frame the first layer from the blur group. In the third frame the second layer from the blured group. Now, the same rule applies for the next layers, here's the rule again:
T means normal text, B means blured, the digits are the layer's number.
1T 1B 2B 2T 2B 3B 3T 3B 1B .
I've added the first blured layer on the last frame because the animation will repeat (start again from the begining).
If you've started with 3 text layers, after this step you should have 9frames:

6. To make the animation smoother we must add some Tween between the frames. This part takes some time & attention. You must apply Tween only between the 9frames created before. To apply Tween , click on one frame, then SHIFT+CLICK the frame next to it to select both frames, after that click the Tween button (the one next to the Duplicate Selected Frames button). Tween using 2 frames.

7. After you did the previous step for all the 9 frames ( that means 8 times), you only have to change the delay time for the frames 1T,2T and 3T (as noted in step 5) to 0.30sec or something like that. To save the animation go to File->Save for Web and Devices (ALT+SHIFT+CTRL+S) choose GIF and save.
Zooming text animation banner effect
In this tutorial, we will learn how to create an attention grabbing zoomed text animation effect. A very effective and smooth looking animation technique in photoshop. For the purpose of this tutorial, the design aspect of this banner will remain clean and plain. Our main focus here is the animation.
Here is what we will be creating:

This tutorial will also cover the basic design aspect of a banner ad, so if you want skip this part, you can go directly to the animation part
We will create a very popular size, 300x250 square banner ad. To get started, click on FILE » NEW and enter width: 300 pixels, height: 250 pixels, Resolution: 72 pixels/inch
One of the first rule of creating a banner ad is we need to create a 1px border around the whole banner. This will give the banner a defined space, and the images displayed inside will be confined within the border rather than abruptly end at the edges.
To create the 1px border, first create a new layer by selecting in the top menu "Layer » New » Layer" - name this layer 'border' and click OK.

Now press "CTRL + A" on your keyboard, this will make a selection around your entire banner.
Then go to "Edit » Stroke" - in the stroke dialog, set the following: "Width:1px - Color: black, Location: Inside, Mode: Normal, Opacity: 100%". Click OK, then press "CTRL+D" to deselect the selection.

To give our banner a nice background, lets add a nice gradient to the background. Select the shape tool "Rectangle Tool"

Use this tool to draw a shape large enough to cover your whole banner. Slightly larger is fine as long as the full banner area is filled by this shape. Make sure this new shape layer is placed underneath the border layer we created above. if not, the drag it down.

Now, with the shape layer selected, go to "Layer » Layer Style » Gradient Overlay" - in the gradient color box, set the following colors (or any color you want):

ou should end up with a background like this:

Now lets add some texts for animation. Use the text tool to write your text.

This part is optional, because how you want your text to look is entirely up to you, but I prefer to add a little style and color to my texts, so with the text layer selected, click on "Layer » Layer Style » Gradient Overlay"
Add the following

On the left where the Blendin g Options are, click the "Inner Shadow" and apply the following:

Click on the Drop Shadow option and apply the following

and lastly, this Stroke style

If you followed the above, you should have something like this: (you may apply your own styles for your own look and feel).

Now comes the FUN part. Animation.
First, we need to duplicate the text layer. So select the text layer, right click and select DUPLICATE LAYER

Then create a new layer " Layer » New » Layer " - then hold down CTRL + click on the new layer you just selected, and the DUPLICATE text layer, and press "CTRL+E" - this will merge the new layer, and duplicated text layer together, creating a new rasterized layer of the text with the applied styles (see the animation below) . The reason we have to do this instead of just 'rasterize' the text layer is if you just 'rasterize' the layer, the layer styles will scale along with the layer when you resize it, giving it an unwanted styles effect on the layer.

Now Duplicate this new merged layer 4 times. ( as above, right click on the layer, and select "Duplicate Layer", do this 4 times)
You should now be left with 5 copies of that rasterized layer.

Now, for each of the new duplicated layer, we will resize them.
So going according to the layers pallete above, select the layer named "Layer 1", then press "CTRL+T" to activate the transform tool. then while holding down the SHIFT key, drag the anchor point outwards to enlarge this layer, so that it's slightly larger than the original. Press Enter to apply this change.

Now, lets hide all the above layers so it's easier for us to see what we're working with.
for "Layer 1 copy" - do the same as above, BUT this time maker it slightly smaller than the original.

Now, repeat for all above layers "Layer 1 Copy 2, Layer 1 copy 3 and Layer 1 Copy 4", for each layer, resize it so it's smaller than the previous layer, like so:

Ok, now lets animate it. first, lets HIDE all the text layers, leaving only the background. To hide the layers, click on the "eye" icon.

If your animation pallete is not visible, click on WINDOW » and check the "Animation" option. In your animation pallete, there is a button you will need to click to create a new frame, as shown below, so remember this button when I say "create new frame"

With all your text layers hidden, your first frame in the animation should be like the above. just blank. Now, click on the 'create new frame' button to create a new frame. Everytime you create a new frame, you will be working directly on that frame only, so whatever movements you make will affect that frame only. With this new frame created, set your "Layer 1 copy 4" layer (which is the smallest text) to visible by enabling the 'eye' icon.

Next, create another new frame, this time, HIDE the "Layer 1 copy 4" layer, and enable "Layer 1 copy 3"....
Then, create a new frame, and HIDE "Layer 1 copy 3" and enable "Layer 1 copy 2"....
Then, create a new frame and HIDE "Layer 1 copy 2" and enable "Layer 1 copy"....
Then, create a new frame and HIDE "Layer 1 copy" .. and enable "Layer 1"...
and lastly, HIDE "layer 1" and enable the original text layer.

Now you should have a total of 7 frames, and if you click the PLAY button on the animation pallete, you will see the following:

It's too fast I'ld say, unless thats the look you want (flashing and annoying), I would set some timing. Underneath each frame, it current says "0 sec" - click on this to set the timing for each frame. Here is my settings.

And here is the result:
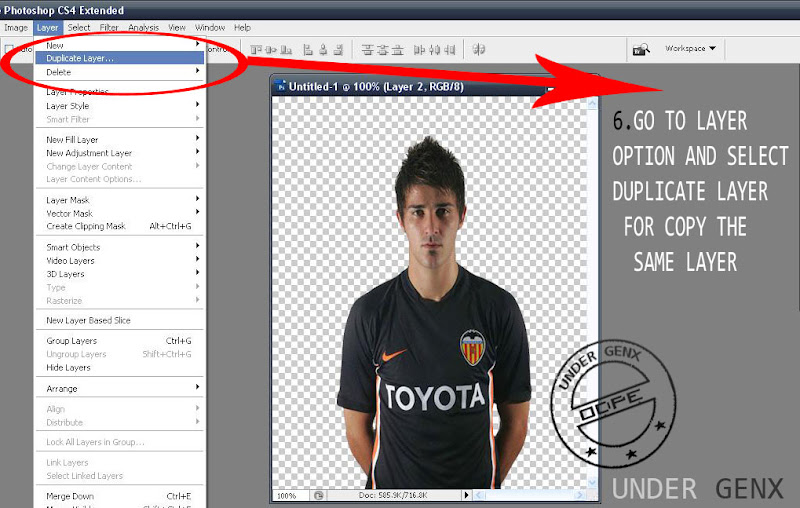
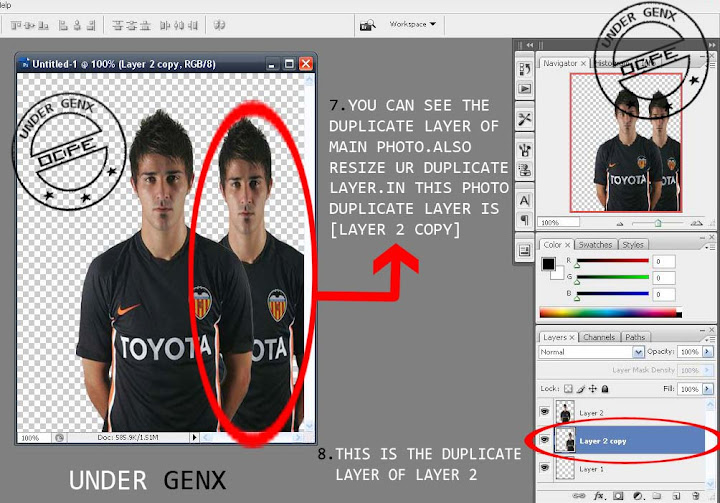
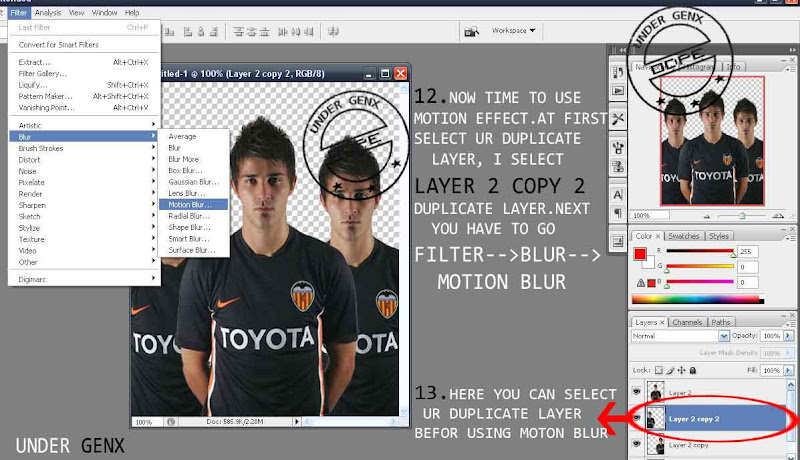
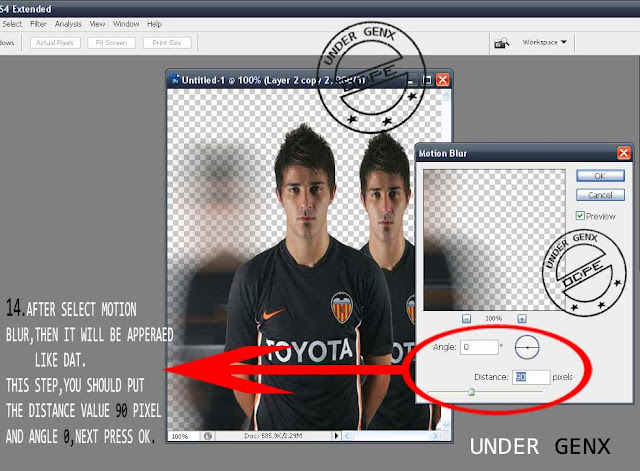
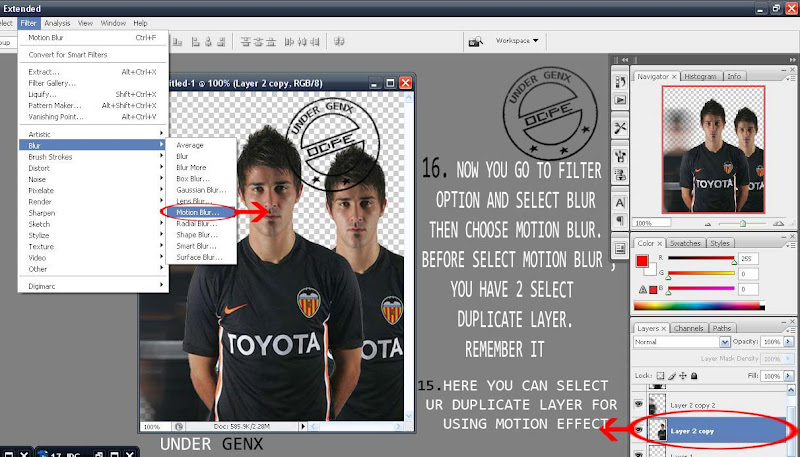
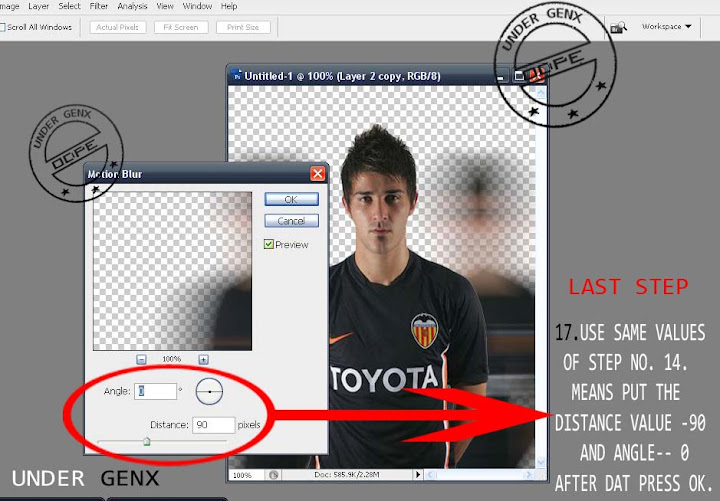
HOW TO MAKE MOTION PNG IN PHOTOSHOP
Step 1:
Step 2:
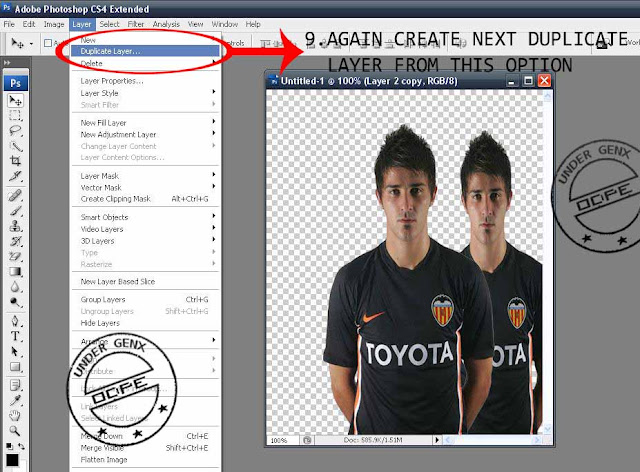
Step 3:
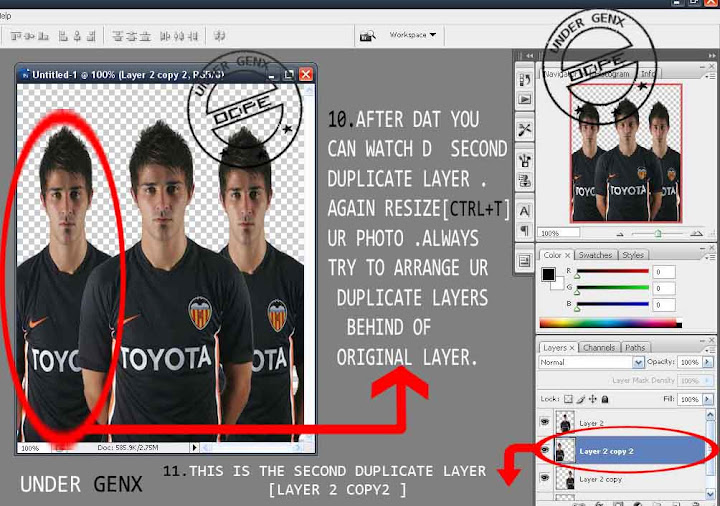
Step 4:
Step 5:
Step 6:
Step 7:
Step 8:
Step 9:
Step 10:
Step 11:
Final:
RESULT IS THIS
Background change Using Photoshop
Step 1:
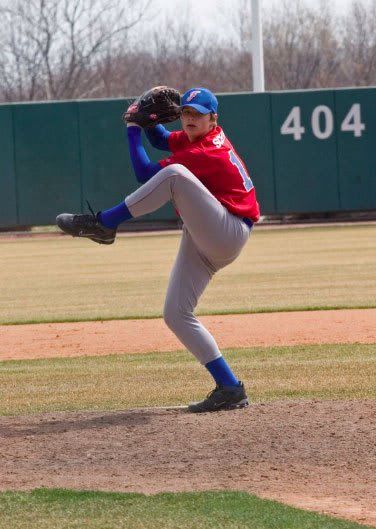
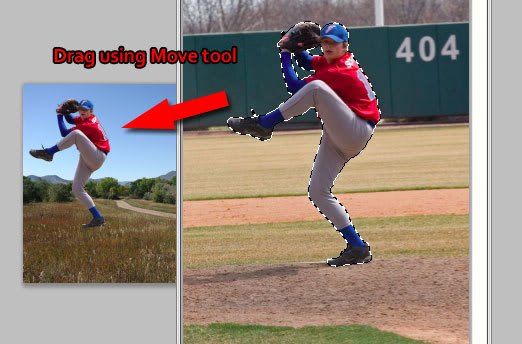
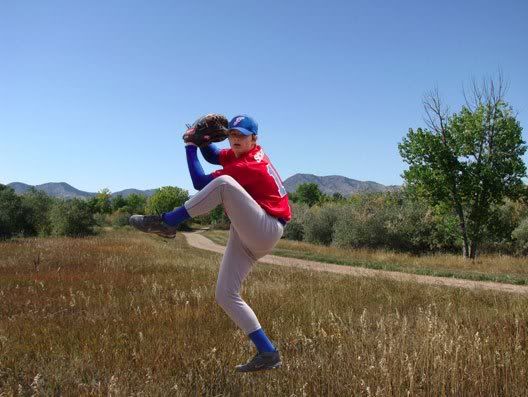
Open your photo using Photoshop. I use a photo of baseball player for this tutorial .
Step 2:
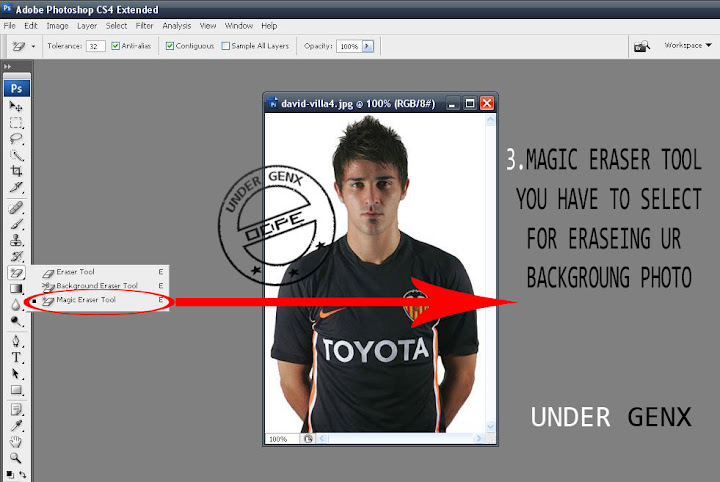
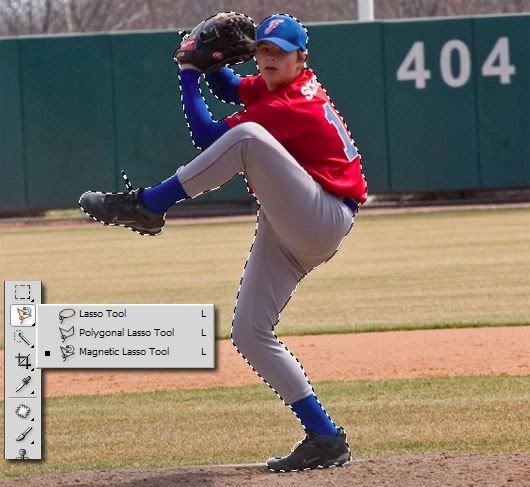
This is what I mention in the first paragraph of this tutorial. To change the photo background, we need to separate / extract the photo model from his background. There are so many way in Photoshop which can be use to do this. For example, you can use:
Selection tool (e.g. Marque, Lasso, Magic wand tool)
Pen tool (to create path)Color Range technique Channel.You must make the selection around the baseball player, just like image below. Remember, you can use any selection technique as described above to do this.
Better to use magnetic lasso tool for better results.
Step 3:
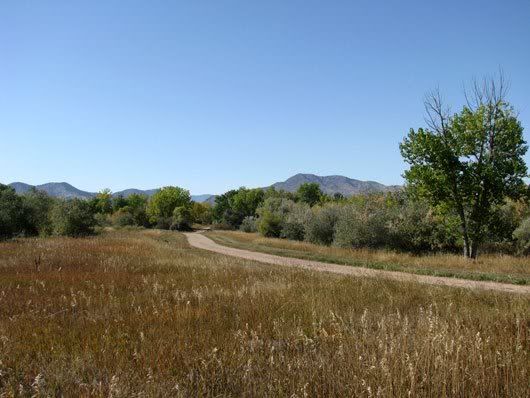
Open another image or photo which you need to make it as a new background.
Step 4:
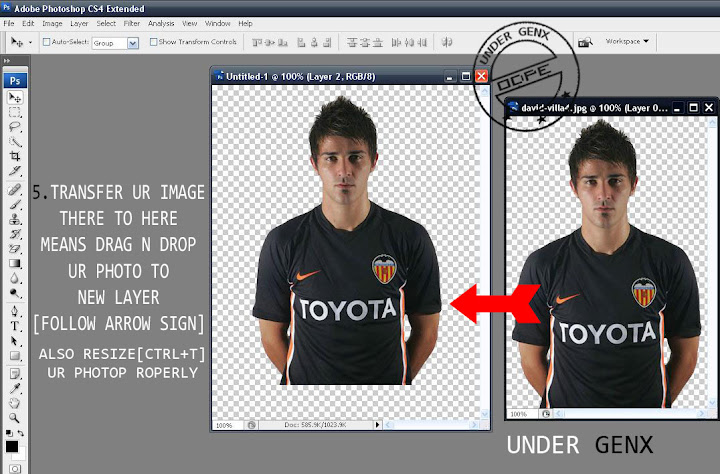
Back to the baseball player photo, now we need to arrange these two photos so they are visible at the same time. If you use Photoshop CS4, you may have to select Window > Arrange > Float in Window. Because Photoshop CS4 is using tabs feature as default.
Then drag the baseball player by using Move tool. You have to drag it from the selection area to the other file.
STEP 5:
Arrange the baseball player position so he placed in a suitable area in the new background. You may need to resize the layer usint ctrl+T if the model and the background aren’t in balanced size.
STEP 6:
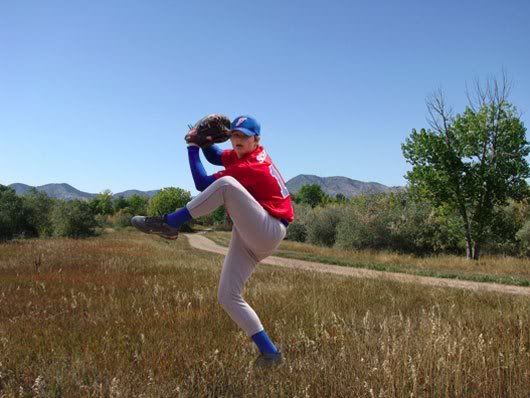
Select Eraser tool to erase some part of his shoe. So it will look like covered with the grass. You can use masking technique too for this. You may not need this step if you are using another photo as background. Be creative with the image you are using. Maybe you don’t need to erase some part of the photo model, but you may need to adjust its lighting source. It all depends on your image.

Here is the result of this tutorial. Practice it with other photos. The more difficult it takes, the more advanced your Photoshop mastering level up.
Photoshop Plugin,fonts and brushes download
14 Great Abstract PS Brushes for Light Effect
One of the best ways to create spectacular abstract effects in Photoshop is by using brushes. They save you time and make the process less complicated. However, taking the time to find high quality brushes isn't all that fun, so I've compiled a list of 11 high quality abstract brushes from various designers which I hope will be useful to you.
Hyper Brushes
Galactic Brushes
Darius Brushes
900Kelvin
Refresh Brushes
Abstract 12
Abstract Vol 6
Edge Brushes
Brushes Pack 2
Abstract Brushes Vol 3
Abstraction
Odysee Brushes
Speedy Brushes
Photoshop Text Style Pack:

Assorted Photoshop Styles:

80 Photoshop Styles:

Transparent Glass Style:

220 Amazing Free Photoshop Layer Styles:

Kids Free Photoshop Styles:

50 Free Photoshop Styles:

20 PS Styles:

101 Assorted Layer Style Effects:
